How I Finally Built the Diamond Trellis of Confederate Jasmine I’d Been Dreaming About


Two weeks ago I finally stopped dreaming and started doing — and the result is now one of my favorite things I’ve added to my yard. A diamond trellis of confederate jasmine on the garage wall facing my house. The idea had been living on a Pinterest board for a couple of years, and once I finally committed to it, everything fell into place faster than I expected.
The Back Story
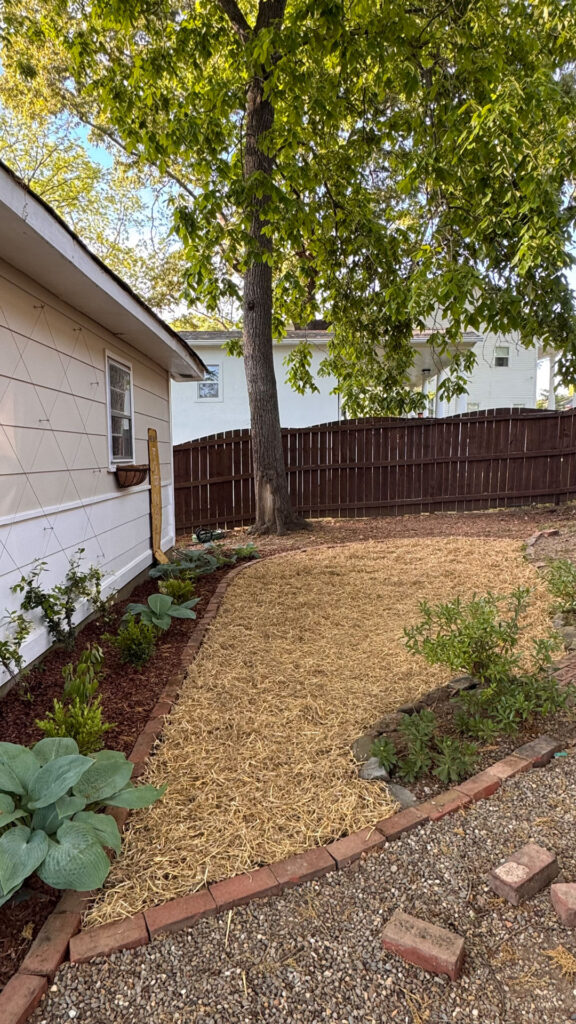
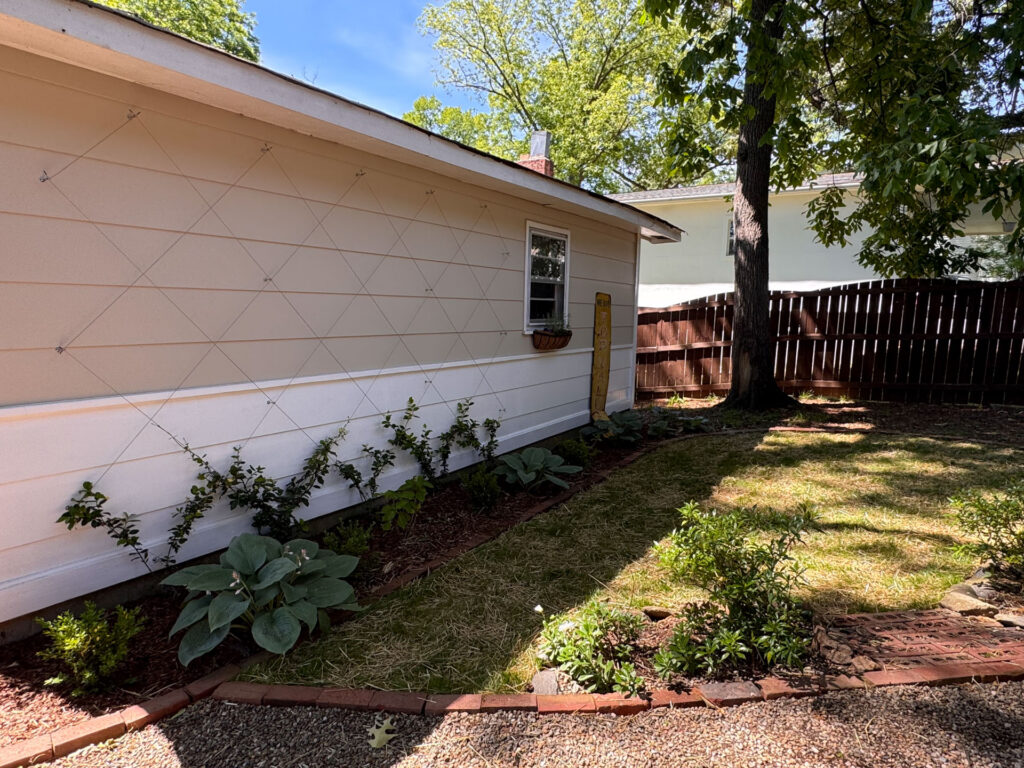
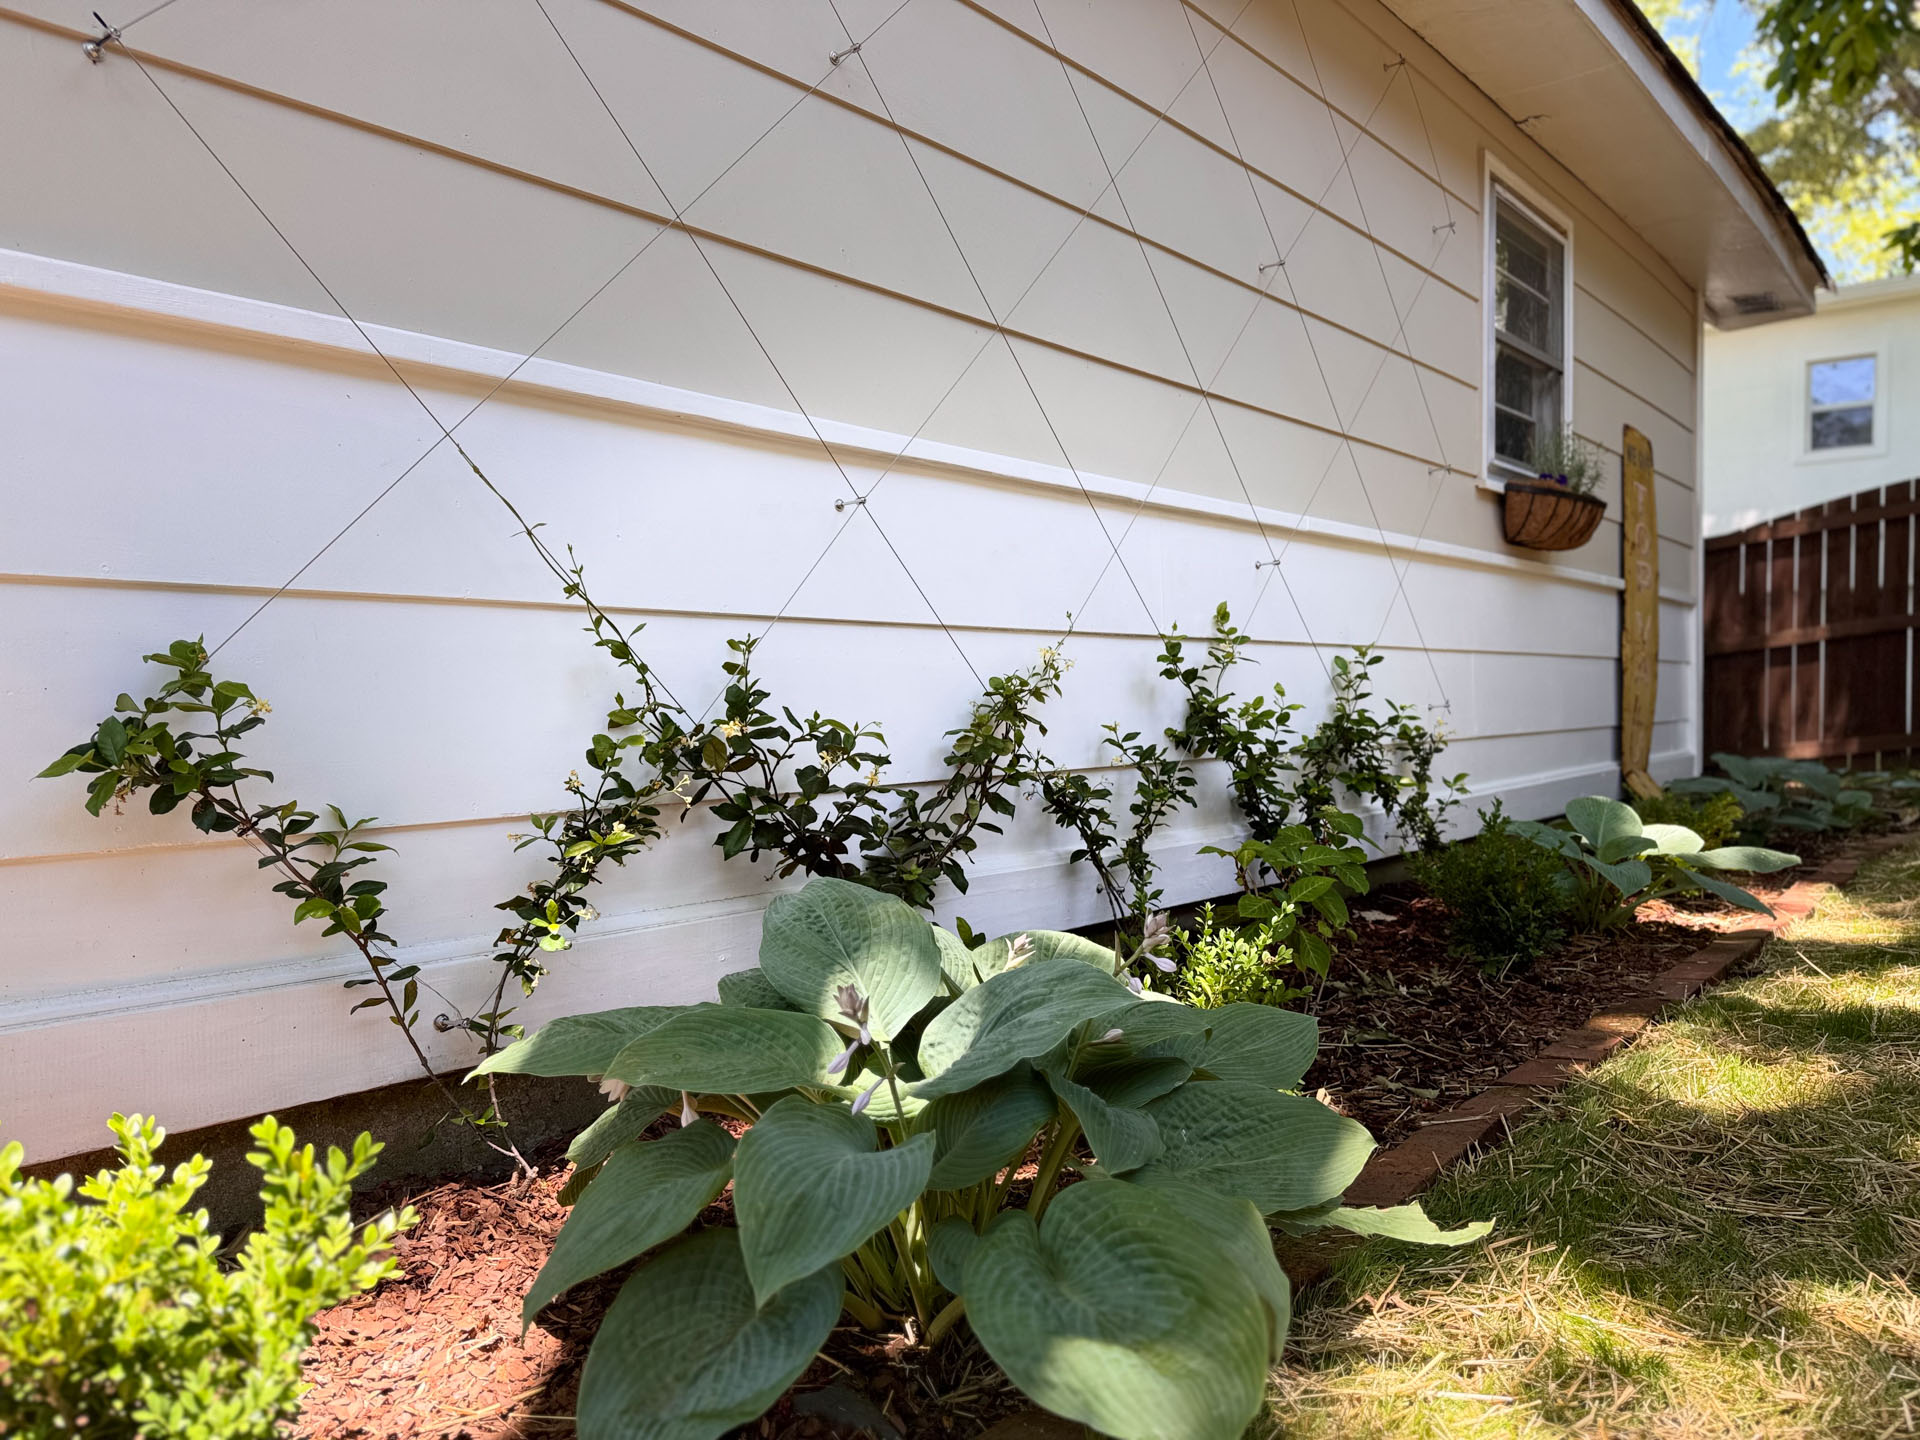
The side of the garage that faces my house is hands down the view I see the most. It’s the only thing visible from my bedroom window, and it’s the first thing I look at every time I walk downstairs to head to my office, my workshop, or the Potager Garden. I see it multiple times a day, which means for years I’ve been staring at a pretty uninspired garage wall.
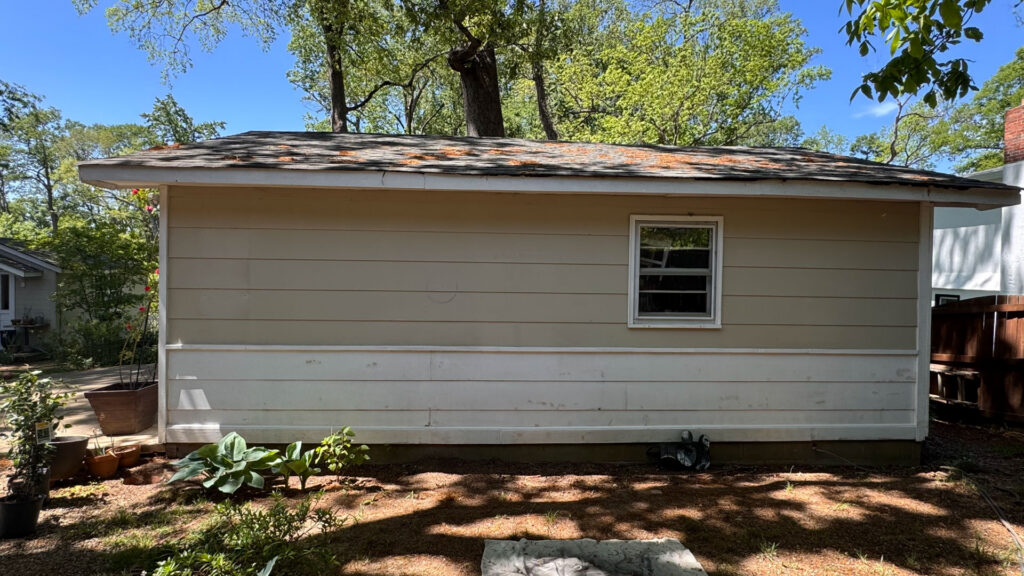
A few years back, I made an attempt to close the gap between the look of my 80s garage and My 1914 Bungalow by adding a railing and painting the lower portion white and the upper section tan to match the main house. It helped. But a large outdoor table was pushed up against the wall at the time, and my senior dog Sampson loved to curl up underneath it. Moving the table wasn’t an option I was willing to consider.
After Sampson passed, I relocated the table to the back of the yard and decided it was finally time — not just to tackle the garage wall, but to landscape the whole area between the garage and the house while I was at it. Here’s how I took a long-neglected corner of the yard and turned it into one of my favorite views.
The Prep Work
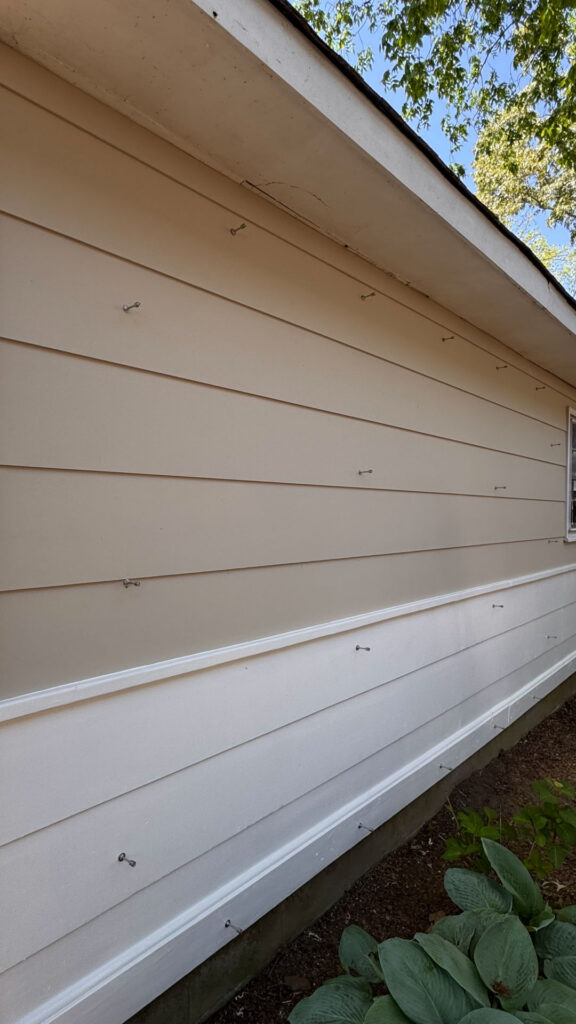
Before anything else, I wanted to make sure the siding was properly waterproofed. That meant adding some extra trim and a significant amount of caulk. And since I was already going to be drilling anchors into the siding, it made sense to touch up the paint at the same time. I ended up repainting all of the siding from scratch, and I’m so glad I did — it really needed it, and starting with a clean, bright surface made everything that followed look so much better.
The Diamond Trellis
The Design
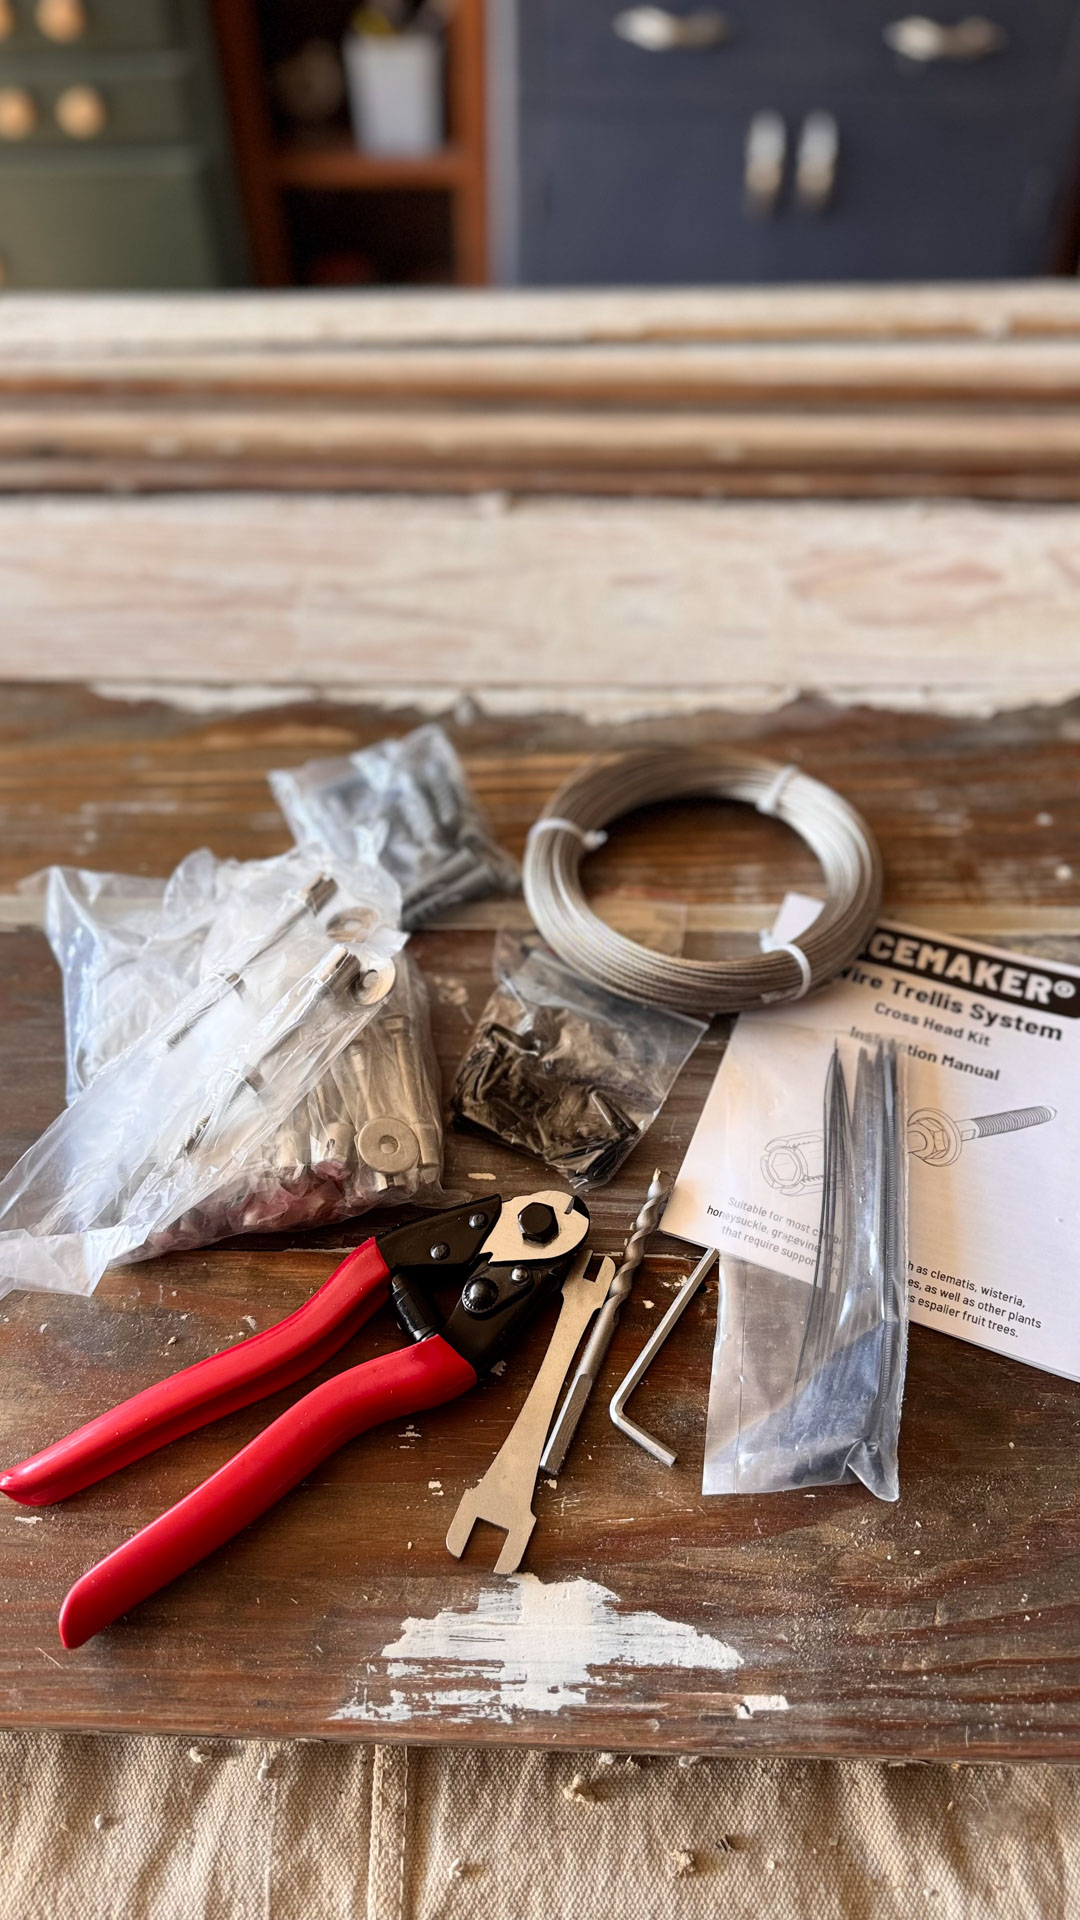
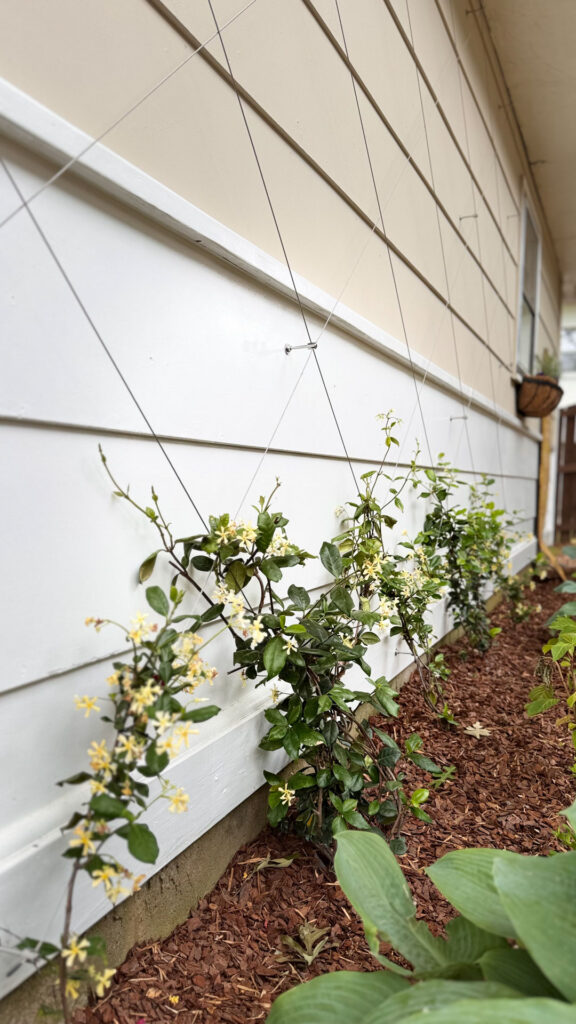
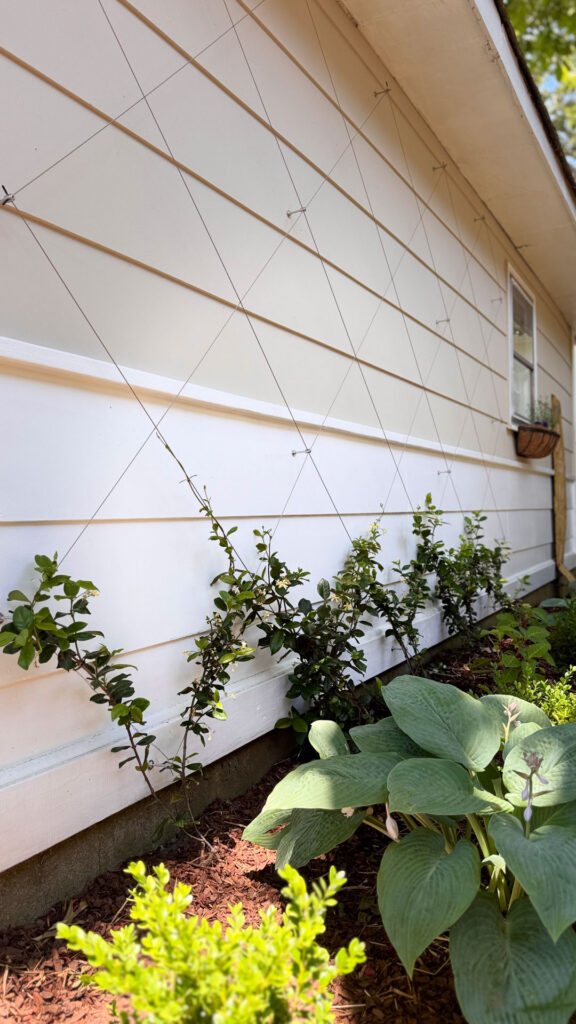
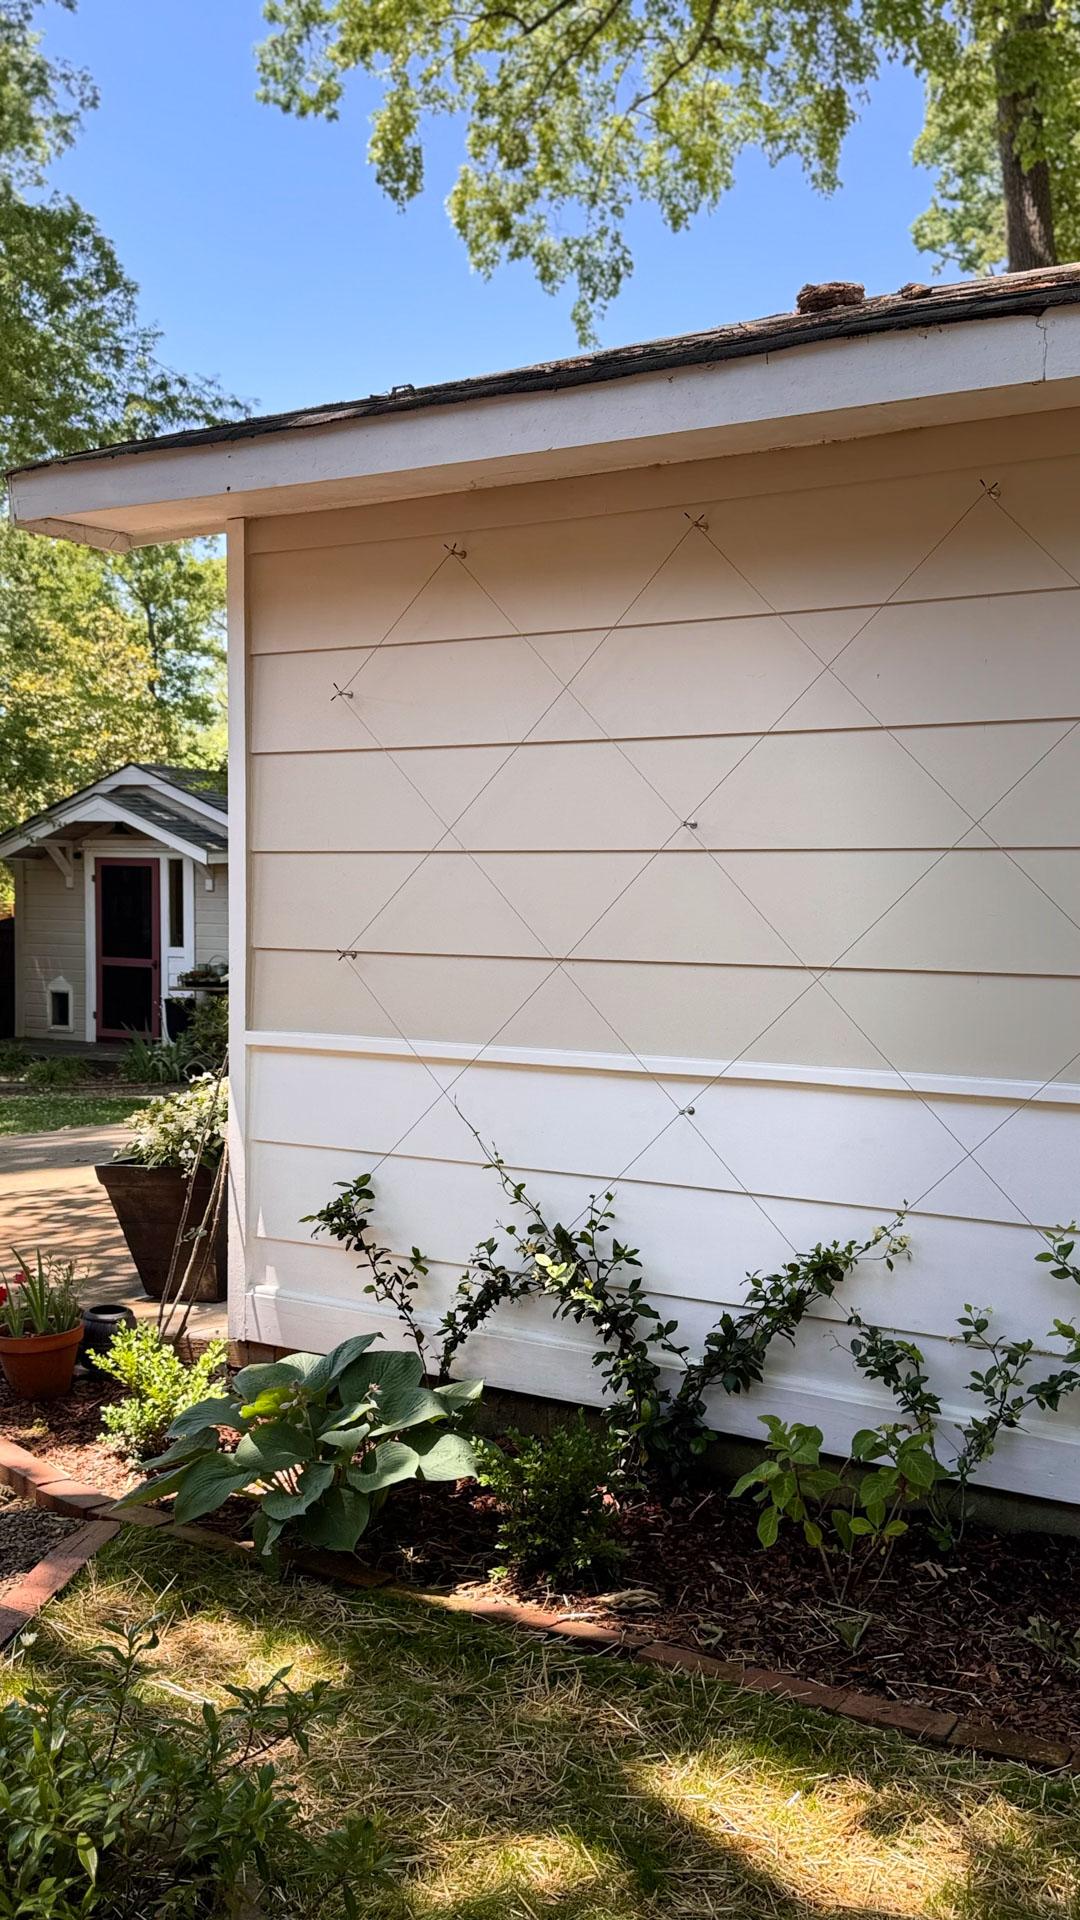
After a bit of research, I landed on this diamond trellis kit — it comes in several quantities, so I measured the wall carefully and spent some time sketching out the diamond size and spacing. There are more configuration options than you might expect, so it took a little planning upfront, but was worth it.
The Kit
Once I had a design I was happy with, I counted all of the endpoints and figured out how many anchors I’d need in the middle. I landed on 20, knowing I could always add more if the structure needed it. I opted for the kit that includes the wire cutter, and I’d absolutely recommend it — don’t skip that if you’re on the fence. The full kit comes with everything you need for installation except a drill.
The Installation
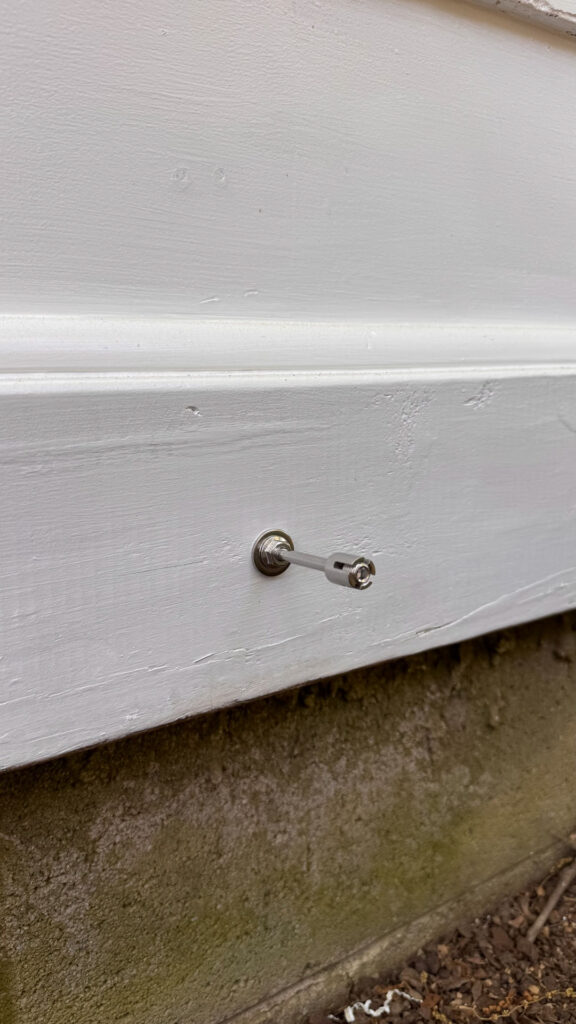
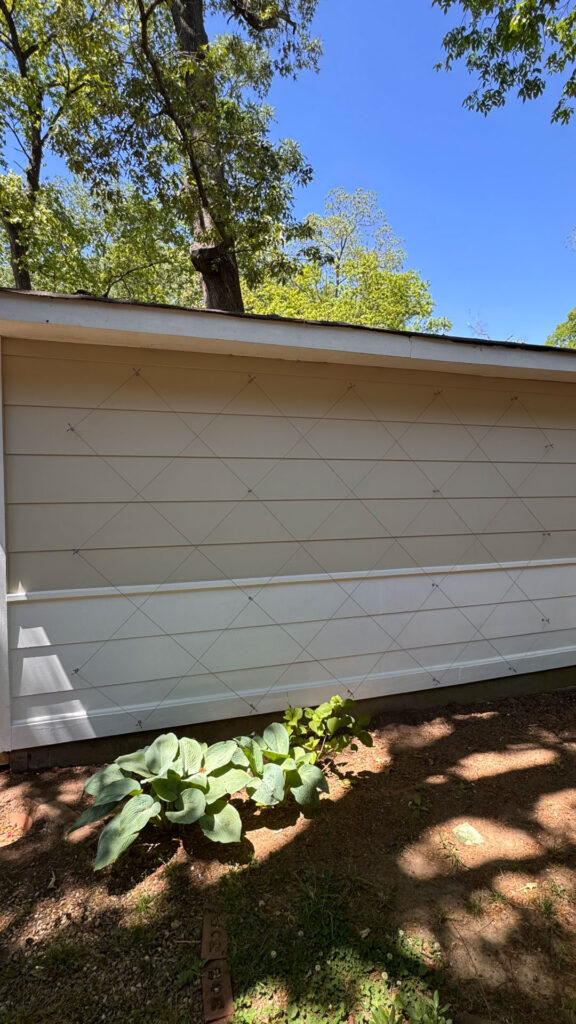
Transferring the design from paper to the garage wall was the most methodical part of the process. I started by finding the center of the space both vertically and horizontally and measured outward from there. Since I wouldn’t need an anchor at every single intersection, I went back through my sketch and circled only the points that would get one — that way I was only drilling where it actually mattered.
The kit includes wall anchors, which I ended up needing in several spots. I took my time figuring out the right depth on the first one, and once I had the process down, I drilled all the holes and installed all the anchors in one pass. Quick and straightforward, even working alone.
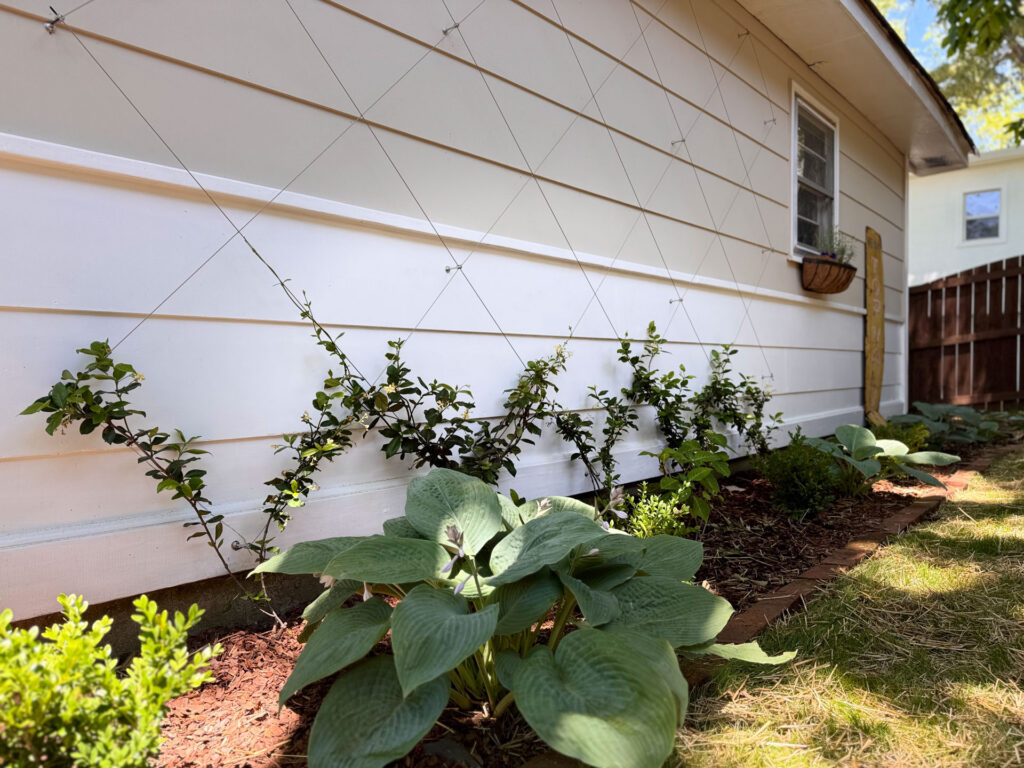
With the anchors in place, I started at the top center and ran wire diagonally down to the bottom, then worked my way left to right and right to left across the wall. The diamond pattern emerged quickly, which was incredibly satisfying. I went back and filled in the shorter connecting pieces, then secured the wire at each anchor point in the middle where the lines crossed. Start to finish, the installation took about two hours.
The Confederate Jasmine
Confederate jasmine was always the plan for this trellis, and for good reason. The scent in the spring is absolutely incredible, but the bigger selling point for me is that it’s evergreen — it holds its leaves year round. I wanted something that would look just as beautiful against the diamond trellis in January as it does in May. A bare wall in winter wasn’t the goal.
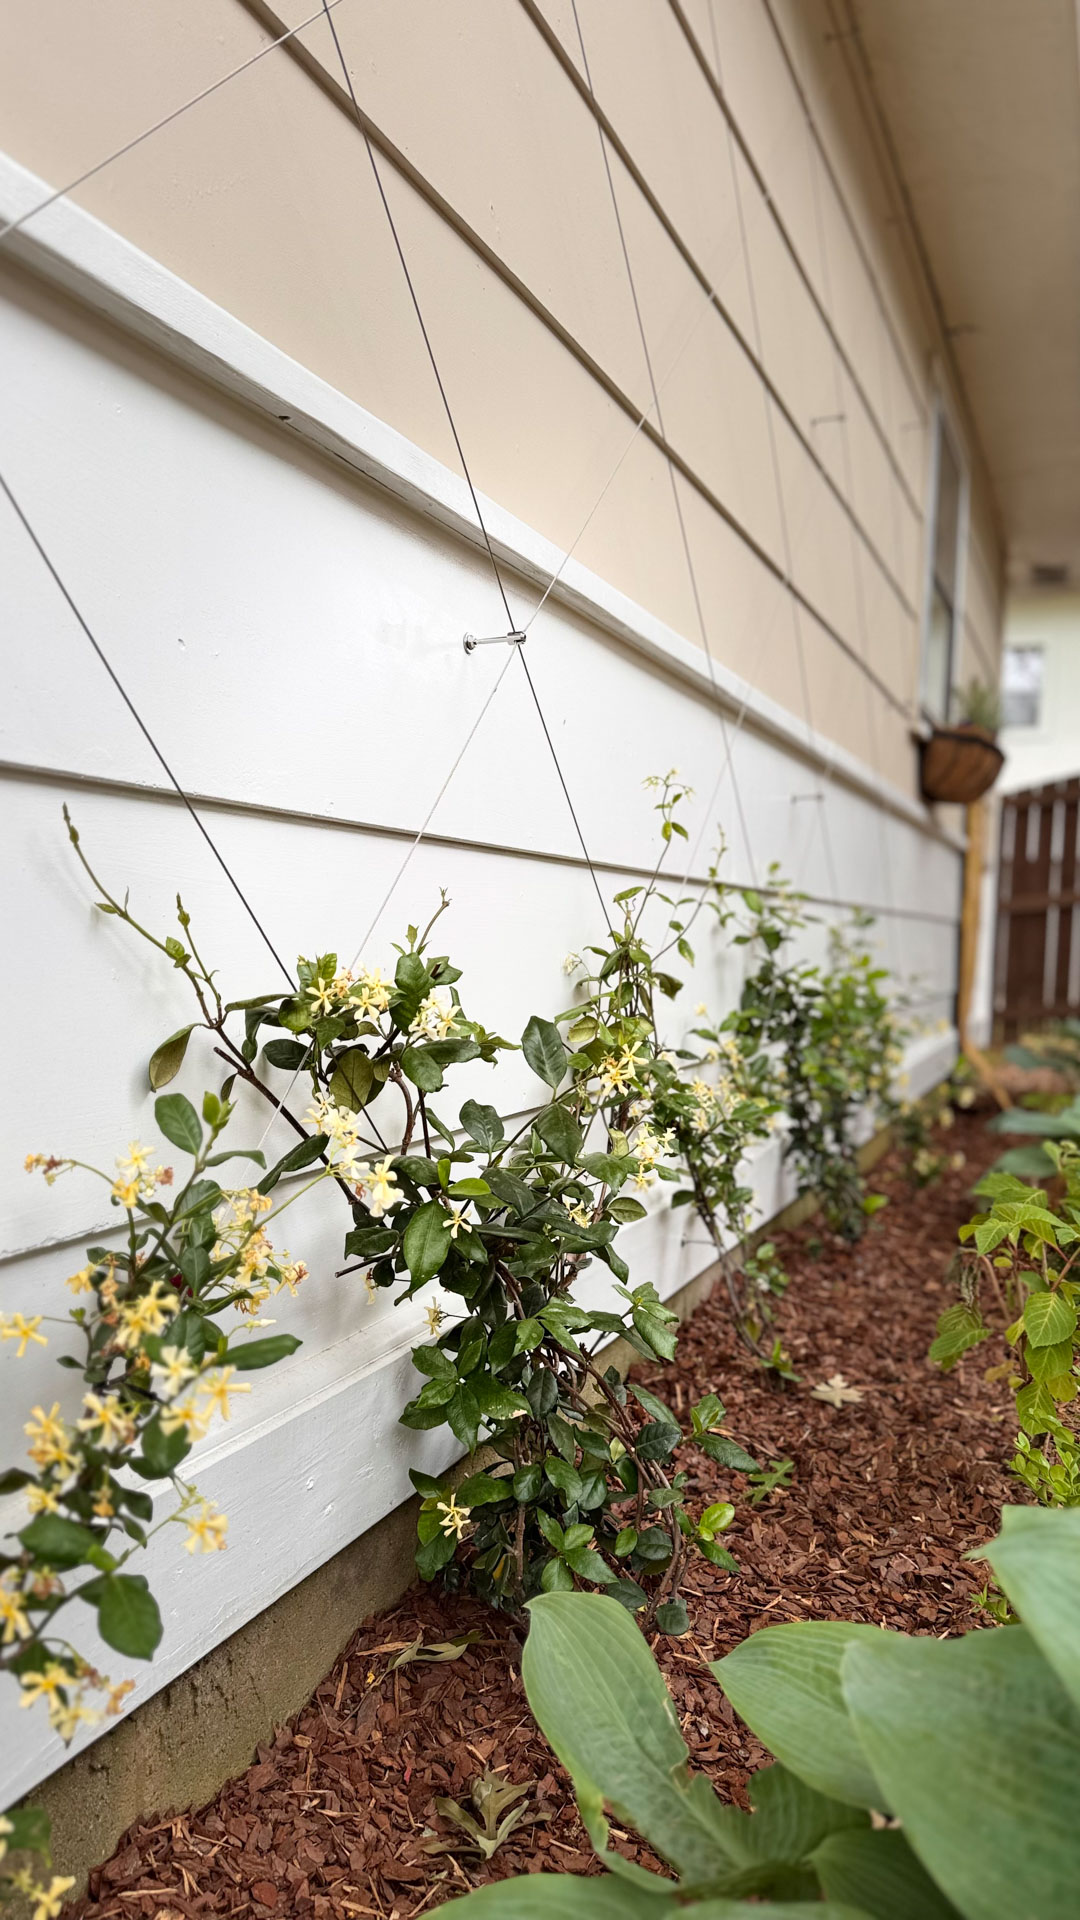
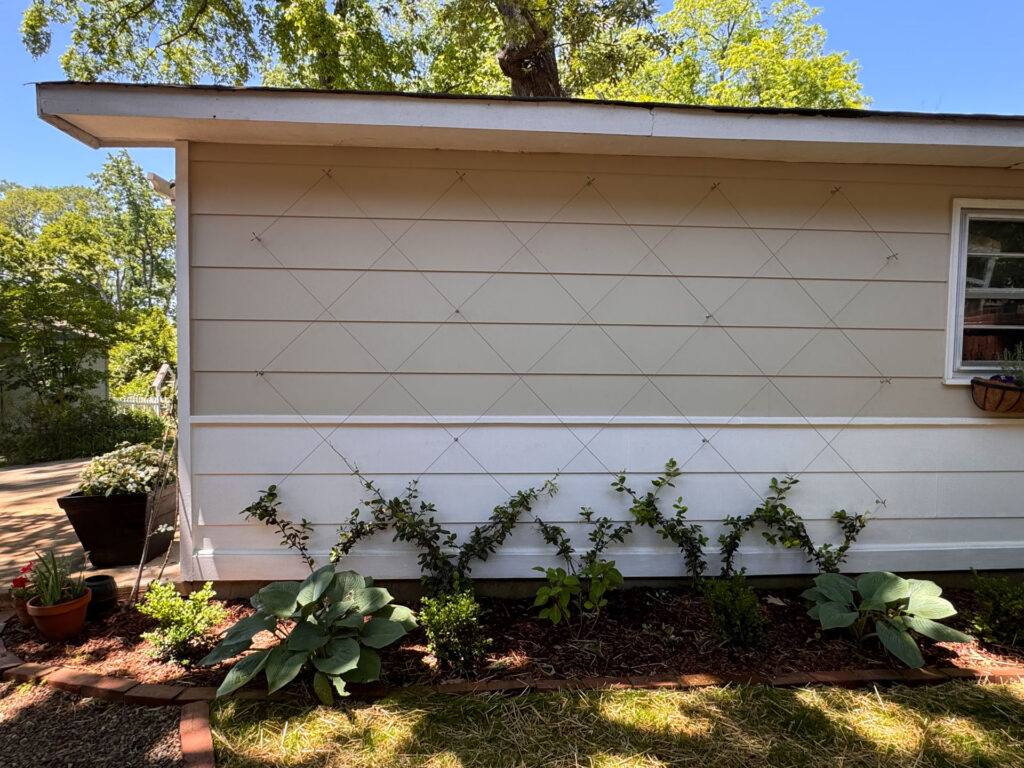
I started with two 2-gallon pots planted below the second and fourth bottom intersections of the trellis, then quickly added three more 1-gallon pots. In just a couple of weeks, they’ve already started reaching. I used the zip ties included in the kit to attach the stems to the wire and will keep training them upward as they grow, following the diamond pattern. I honestly cannot wait to see what this looks like in a season or two.
The Landscaping
This area had been on my to-do list for far too long, so once the diamond trellis was up I kept the momentum going and tackled the landscaping as well.
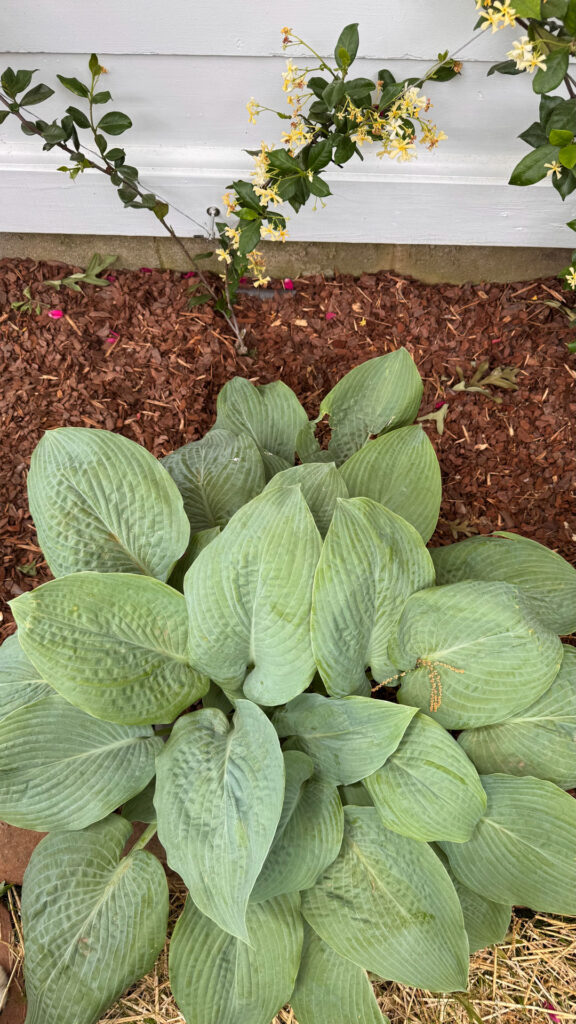
I added a border using salvage bricks I already had on hand, then relocated a couple of large hostas and two hydrangeas from elsewhere in the yard. I filled in the gaps with a few boxwoods and added more hostas along the rest of the border. Landscaping fabric and puppy-safe mulch finished off the beds, and then I turned my attention to the dirt area between the beds and the garage.
I’ve tried to grow grass in that spot more times than I can count. Hot southern summers plus my tendency to forget to water equals dead grass. This time I decided to actually solve the problem: I installed this DIY irrigation system — the same one I used in the front yard — and it was simple enough to handle for this smaller area. If you’ve been curious about putting in an irrigation system on a budget, I’ll link that post here.
With the irrigation lines and sprinkler heads buried, I tilled up the soil, spread seed, and covered it with hay. Two weeks in, the grass is coming up well. Fingers crossed this is finally the year it sticks.
The After
A flower box below the garage window was the finishing touch, and now this whole area has become one of my absolute favorites. I find myself looking at it from my bedroom window constantly — which, when you think about it, is exactly what I was hoping for all along.
There’s something really special about watching an idea you’ve been sitting on for years finally come to life. This one exceeded every expectation I had, and it’s only going to get better as the confederate jasmine climbs.
Products Used
Wire Trellis Kit
Confederate Jasmine
Boxwoods
Hostas
Landscaping Fabric
Mulch (safe for pets)
Ryobi Drill
This post contains affiliate links, meaning we may earn a small commission if you purchase through our links, at no cost to you. Thank you for supporting Heather Homes!


+ Show / Hide Comments
Share to: